Prepare MicroSD Card in Windows
Overview
This guide will walk you through the process of preparing a MicroSD card for installing an operating system onto the CM3588. Before proceeding, ensure you have already downloaded the OS image you wish to install.
Clean and Partition the MicroSD Card
If your PC does not have an SD Card slot, you can use a USB MicroSD card reader.
If you wish to support my videos and these wikis, please consider using the below affiliate links for the MicroSD card and reader that I use, even if you do not purchase anything, clicking the links may help me earn a small commission
- MicroSD Card (Patriot Memory LX Series)
- USB MicroSD Card Reader (SanDisk MobileMate USB 3.0)
Once the card is inserted into your system, follow the instructions below to wipe and format the MicroSD card.
It is extremely important to make sure you are selecting the correct device as all data will be wiped.
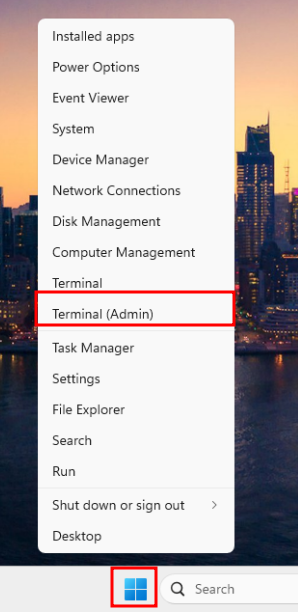
The first step is to identify the MicroSD card on your system. I prefer to use diskpart, and in certain cases the Disk Management tool. Start with diskpart by right-clicking the Start button and selecting Terminal (Admin)
Now launch diskpart with
diskpart
Then list out the available disks.
list disk

For my system, I know that my OS disk is 128GB and my MicroSD card is 16GB.
Due to how disk sizes are calculated, the MicroSD card will likely show as smaller than advertised.
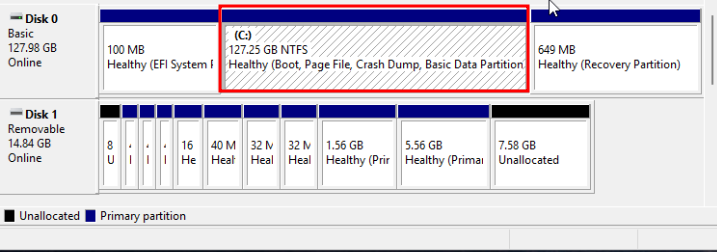
If you are still unsure which disk, you can remove the MicroSD card and run the list disk command again to see which disk disappears. Another option is to open up the Disk Managerment tool by right-clicking the Start button and selecting Disk Management. Look for the disk that has a Boot, Page File, Crash Dump, Basic Data Partition, etc... label. This is your OS disk, and the MicroSD card will not have any of these labels. Note which disk number is your MicroSD and go back to diskpart.
Back in diskpart select the MicroSD card by using the disk number you noted earlier. For example, if your MicroSD card is Disk 1, you would enter:
select disk 1
Now clean the disk.
This will remove all partitions and data from the MicroSD card, so make sure you have selected the correct disk.
clean

Next, create a new partition on the MicroSD card.
create partition primary

The disk is now ready to be formatted with the SD Card Formatter. You can close out of the Terminal now.
Format the MicroSD Card
Download the SD Card Formatter by navigating to SD Association and scrolling down to the section labeled SD Memory Card Formatter Download for Windows/Mac. Although this step may not always be needed, it is recommended to use the SD Card Formatter as it will ensure the MicroSD card is formatted correctly and reduce the chance of errors.

Click For Windows then scroll down to the bottom and click Accept.
This will start the download. Once complete, extract the files by right clicking on the zip file and then selecting Extract All....

Then click Extract. The folder will open automatically, open the folder SDCardFormatterv5_WinEN
Double click on file inside to launch the installation. Simply click Next, then select the option to confirm you accept the terms in the agreement, and click Next again. I usually leave the installation folder as the default, but you can change it if you wish. Click Next again, then Install. You may need to click Yes to allow the app to make changes to your device. Finally, leave the Launch the program selected and click Finish.
When the application opens up, it likely will already have the MicroSD card selected. If not, select it from the drop down menu. You will know it is the MicroSD card as it will likely display the card information. If no changes are necessary, simply click Format.
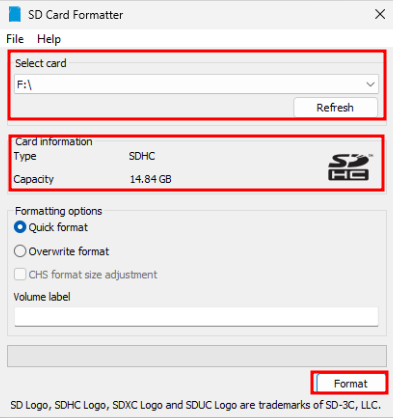
You will be prompted to confirm the format, click Yes. Let the process finish and then click OK. Close out of the SD Card Formatter application.
Flash the Image
Next, download the USBImager tool from gitlab. This tool is a simple and effective way to flash the OS image onto the MicroSD card. Scroll down to the ReadMe section and click the GDI link in the Windows section.

Once the download is complete, extract the files just as before with the SD Card Formatter. Double click the file usbimager to open up the application. You may need to click Yes to allow the app to make changes to your device.
In the top section click the ... and then select the image you want to flash.
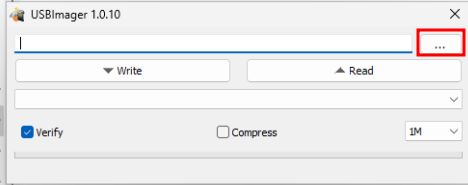
Then in the drop down menu select the MicroSD card.
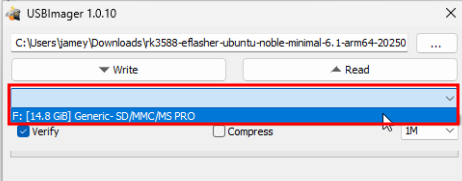
Finally, click Write. This process can take some time, however there will be a progress bar on the bottom.
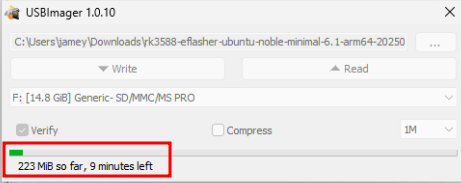
Once complete, there will be a message that the Image was written successfully.
The MicroSD card is now ready to be inserted into the CM3588 and booted up. Return to the guide which linked here and continue with the installation instructions.