Setup Proxmox Backup Server
This guide is in the queue for a video and will be uploaded to the Hake Hardware YouTube channel soon!
Overview
Proxmox Backup Server is a powerful tool for backing up and restoring your Proxmox Virtual Environment (PVE) and containers. It provides a reliable and efficient way to protect your data. In this guide, we will walk through the process of setting up Proxmox Backup Server.
Make sure to check the Proxmox Backup Server Documentation to see the minimum system requirements and other important information.
Back Up Schedule
There are a lot of jobs and actions that occur during the backup lifecycle. Here is a quick overview of the jobs that will be created in this guide along with when I run them. This is a good starting point, but feel free to adjust the schedule to fit your needs.
** Daily Jobs **
Daily - 00:00 - Prune Job Bob (Prune backups for the bob-backups namespace)
Monthly - 03:00 - Garbage Collection (Run garbage collection to reclaim space)
Daily - 04:00 - Verify Job All (Verify backups for all namespaces)
Daily - 05:00 - Sync Job (Sync backups from the store1 datastore to the store2 datastore)
Daily - 21:00 - Prune Job Mario (Prune backups for the mario-backups namespace)
Download the ISO
Go to the Proxmox download page. Download the lastest version of Proxmox Backup Server ISO.

Create Installation Media
I recommend using a tool like Ventoy which allows you to create a bootable USB drive with multiple ISO files. This way, you can have multiple operating systems on a single USB drive.
However, if you prefer to use a single ISO file, you can use something like Rufus or Balena Etcher to create a bootable USB drive.
Install Proxmox Backup Server
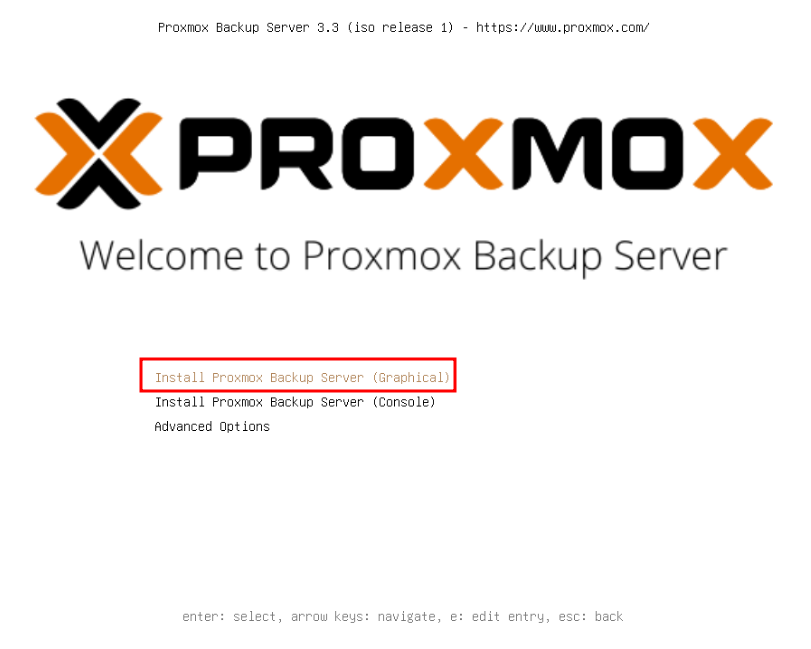
Boot the server from the USB drive. You should see the Proxmox Backup Server installation screen. Select Install Proxmox Backup Server (this guide will use the Grapical option) and hit Enter.
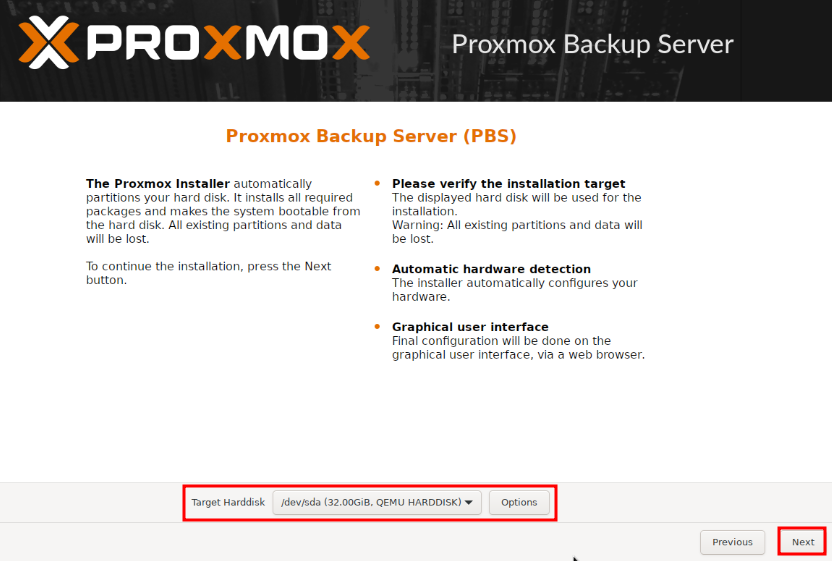
Agree to the EULA by selecting I Agree and hitting Enter. Select the target disk where you want to install Proxmox. I highly recommend using a separate disk for Proxmox Backup Server. This will help keep your backups separate from your main operating system. Ensure the correct disk is selected, and then click Next.
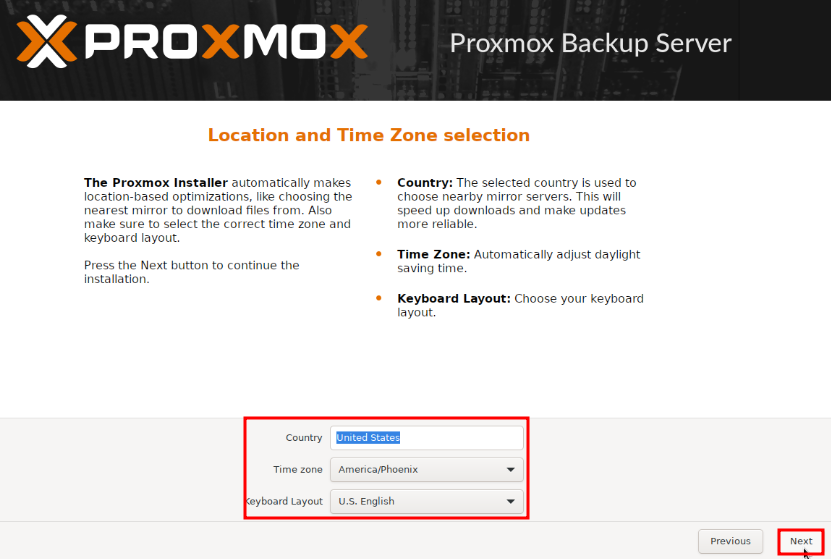
Enter the country, time zone, and keyboard layout. This is important for ensuring that your server is set up correctly. Click Next when you are done.
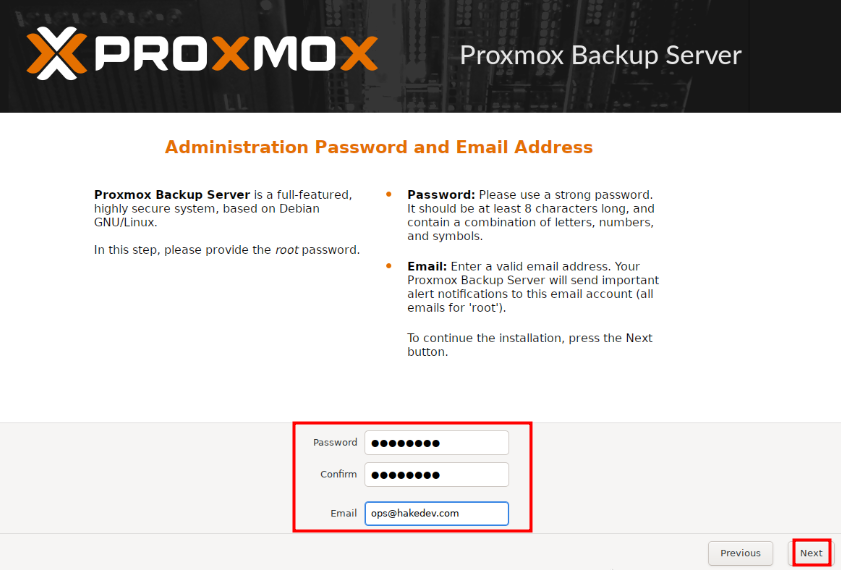
Enter the password for the root user and the email address for notifications. This is important for security and for receiving notifications about your server. Click Next when you are done.
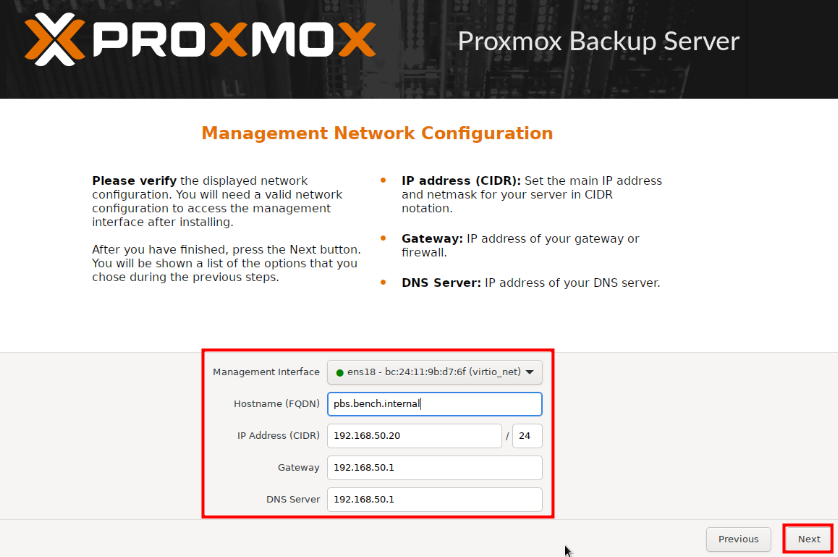
This next screen can be a little intimidating. When I first started using Proxmox I was really confused by what to put here. If you have a backround in networking, this will be easy for you. If not, don't worry! I will explain what each field means.
- Management Interface: Select the network interface you want to use for Proxmox Backup Server. This is usually the first network interface. If unsure, you can check your router to see the MAC address of the network interface and select the correct one.
- Hostname (FQDN): The Fully Qualified Domain Name (FQDN) your PBS will use. This includes the hostname and a domain (e.g., pbs.localdomain or pbs.yourdomain.com). I usually choose pbs.internal. I am not entirely the implications of this, and I usually add a DNS entry in pi-hole for whatever hostname I specify here. If you are not using a local DNS, as far as I can tell nothing bad will happen other than you will need to use the IP address to access the server.
- IP Address (CIDR): IP address for your server. Make sure to use a static IP address, as this will make it easier to access your server later. You should make sure that the IP address you choose is not already in use by another device on your network. The CIDR notation (e.g., /24) specifies the subnet mask. A /24 subnet mask means that the first 24 bits of the IP address are used for the network part, and the remaining 8 bits are used for the host part. This allows for 256 IP addresses in the subnet, with 254 usable addresses (the first and last addresses are reserved for the network and broadcast addresses, respectively).
- Gateway: The IP address of your router (or default gateway) — used to access the internet or other subnets.
- DNS Server: The server PBS will use to resolve domain names, this is often the same as the gateway. You could also set it to the IP of your pi-hole or another DNS server. This is important for ensuring that your server can resolve domain names correctly. If you are using a local DNS server, make sure to use the IP address of that server.
In my case, I am using a Unifi Dream Machine (UDM) which has a gateway of 192.168.50.1. I will also use the DNS specified in my router configuration, so I will set the DNS to the gateway of my router. In my router, I already have pi-hole set up as the DNS server. I will specify the IP address for my pbs as 192.168.50.20 which I know is not in use by any other device on my network. In my router I will then go in and ensure that that IP is reserved for my PBS server. For the hostname, I will use pbs.bench.internal (pbs for Proxmox Backup Server, bench because I am creating this on my bench server, and internal because this is an internal domain) which I will also specify in my pi-hole's DNS settings.
Click Next when you are done.
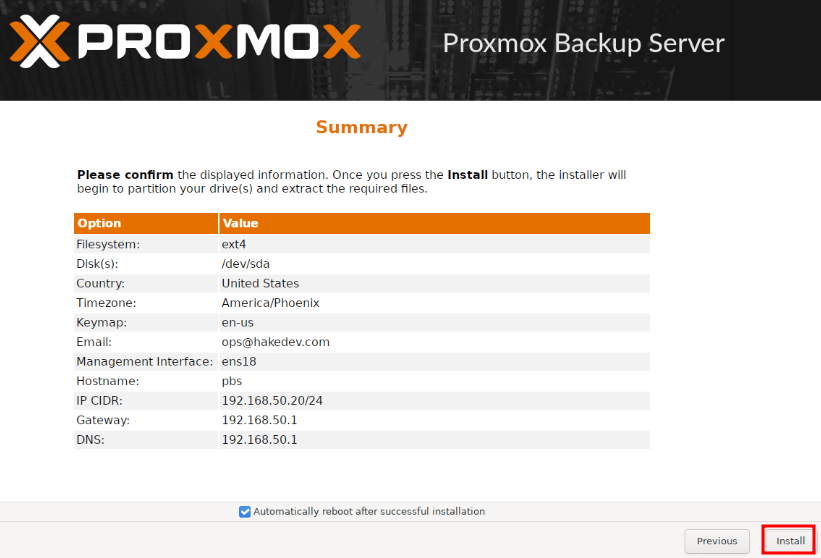
The next screen will show you a summary of your settings. Make sure everything looks correct, and then click Next to start the installation.
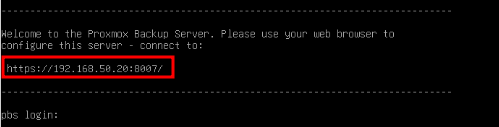
The installation process will take a few minutes. Once it is complete the server should reboot and you will see a screen with the IP address of your Proxmox Backup Server and a link to the web interface. You will need the listed IP address in the next step to access the web interface.
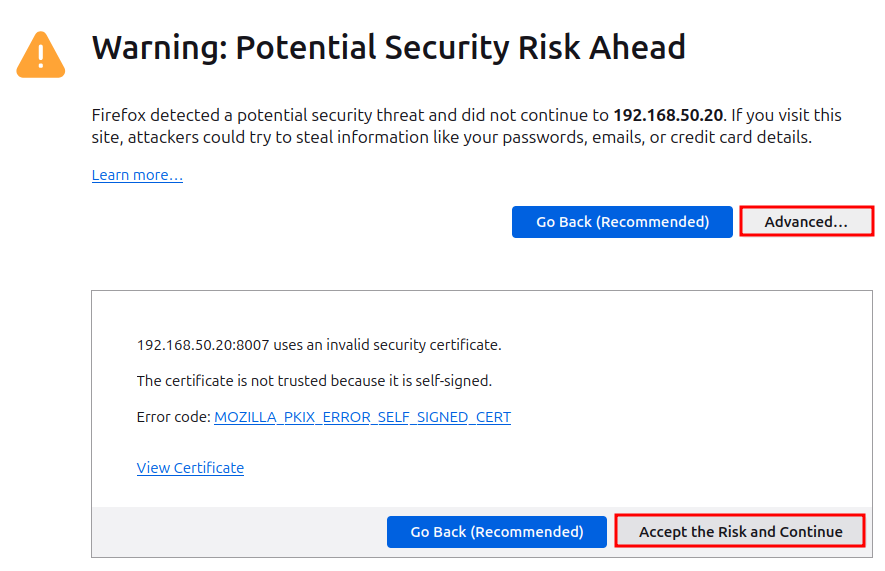
Open a browser and navigate to the IP address of your Proxmox Backup Server. Your browser may show a warning about the SSL certificate. This is because the certificate is self-signed. You can safely ignore this warning and proceed to the website. Click on Advanced and then Accept the Risk and Continue.
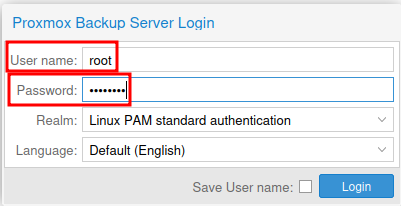
Next, you should see the login screen for the web interface. Enter the username root and the password you set during the installation process.
Once logged in you will receive a message stating No valid subscription. Click OK to dismiss the message.
Post Install Helper Script
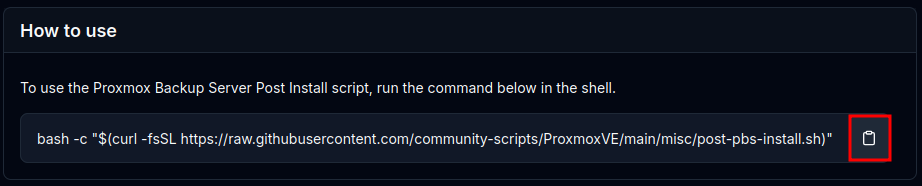
Now that Proxmox Backup Server is installed, you can run the post-install helper script. This script will help you set up your server and configure some basic settings. Navigate to the ProxmoxVE Helper Scripts page and copy the script to your clipboard.
Always be cautious when running scripts from the internet. Review the code and understand what it does before executing it on your system. That being said, ProxmoxVE Helper Scripts are widely used and trusted by the community.
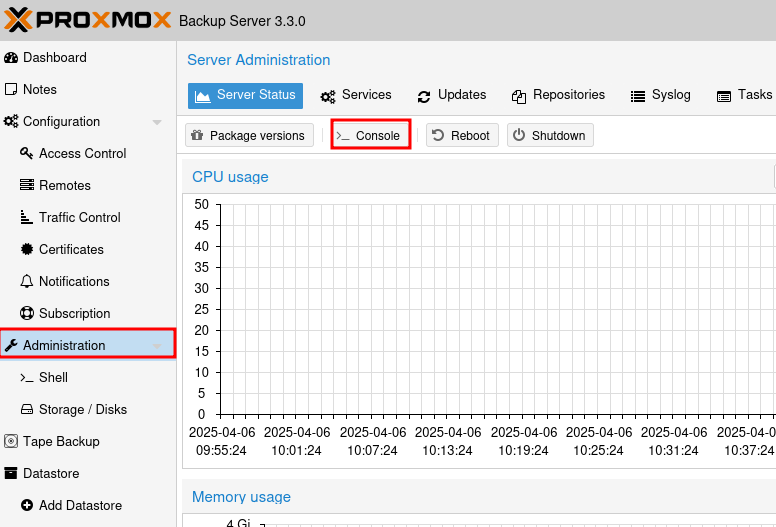
Open the Proxmox Backup Server web interface and click on the Administration menu item, then open the Console. This will open a terminal window where you can paste the script.
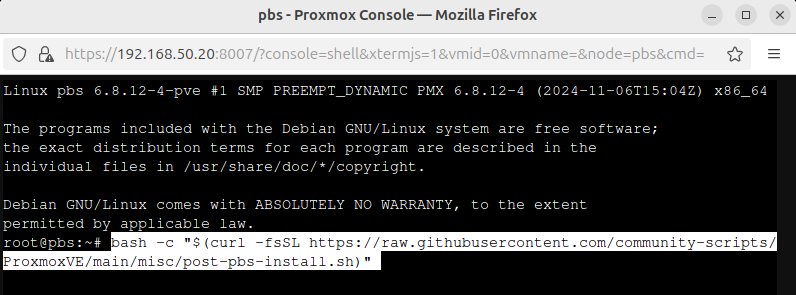
Paste the script into the terminal and hit Enter. This will download and launch the script on your Proxmox Backup Server. When prompted, type y and press Enter to proceed with the installation.
It is best to select yes for all of the prompts, however it is worth verifying if you are unsure. Finally, reboot the server when prompted. This will ensure that all changes are applied correctly.

You can safely close the console window now while the server reboots. Once the reboot is complete, you can log back into the web interface and move to the next section.
Prepare Disk
I will be using a 2TB disk for the backup server. The first step is to wipe the disk via the Proxmox web interface. It's a good idea to wipe the disk before using it for backups, as it may contain old data that could interfere with the backup process.
Wiping a disk will delete all data on it. Make sure to back up any important data before proceeding.
Identify Disk
Under the "Administration" menu, click on the "Storage/Disks" tab. This will show you a list of all the disks connected to your Proxmox Backup Server.
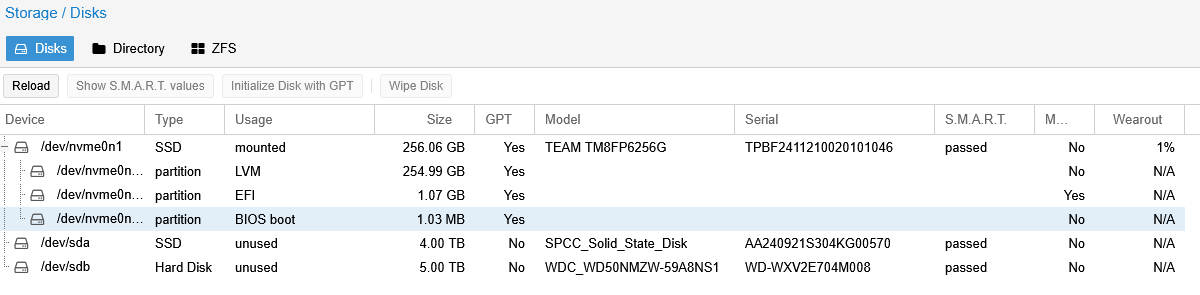
Look for the disk you want to wipe (e.g., /dev/sda). Make sure to select the correct disk, as wiping the wrong disk will result in data loss. In my case, I know that Proxmox Backup Server is installed on /dev/nvme0n1 and the disk I want to wipe is /dev/sda and /dev/sdb.
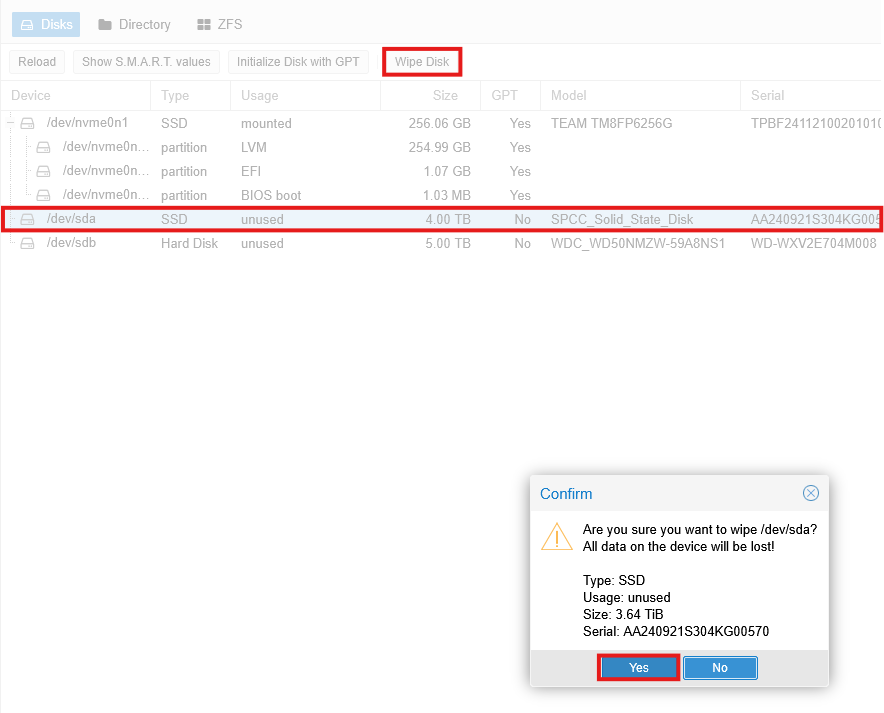
Click the disk you want to wipe and then click the Wipe button. This will open a confirmation dialog asking if you are sure you want to wipe the disk. Click Yes to proceed.
A progress bar will appear showing the status of the wipe operation. This may take a few minutes depending on the size of the disk. Once the wipe is complete, you will see a message indicating that the disk has been wiped successfully.
Create Datastore
The next step is to create a datastore on the disk. A datastore is a storage location where backups are stored. Proxmox Backup Server supports multiple datastores, so you can create one for each disk or use a single datastore for all your backups. In my case I will be using a single 4TB SSD for my primary datastore.
To create a datastore, I prefer to create a directory. Click the "Storage/Disks" menu item and then click on the Create: Directory button.
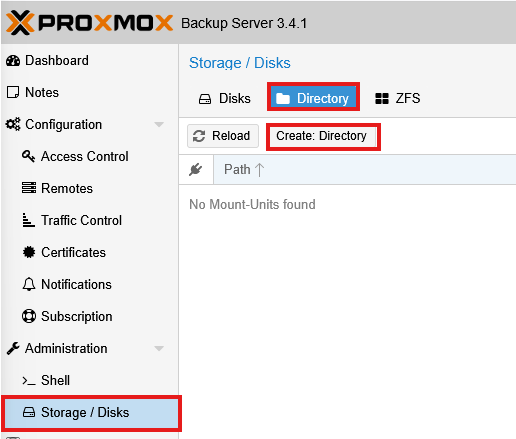
This will open a dialog where you can enter the name of the directory. I usually name it store1 or something similar. Make sure 'Add as Datastore' is checked. Click Create to create the directory.

Create Secondary Datastore
I prefer to sync my backups to a secondary datastore. This is not required, but it is a good idea to have a secondary datastore in case the primary datastore fails. You can use a different disk or a different server for the secondary datastore. I will be using a 5TB External USB drive for my secondary datastore.
Make sure to select "removable" if this is a USB drive which may be removed. If you do not select this option, the drive will be mounted at boot and may cause issues if the drive is not connected.
To create a secondary datastore, click the "Storage/Disks" menu item and then click on the Create: Directory button. This will open a dialog where you can enter the name of the directory. I usually name it store2 or something similar. Make sure 'Add as Datastore' is checked. Click Create to create the directory.

View Datastore
Now that the datastores have been created, you should see them listed under the "Datastore" menu item. Click on the "Datastore" menu item to view the datastores.
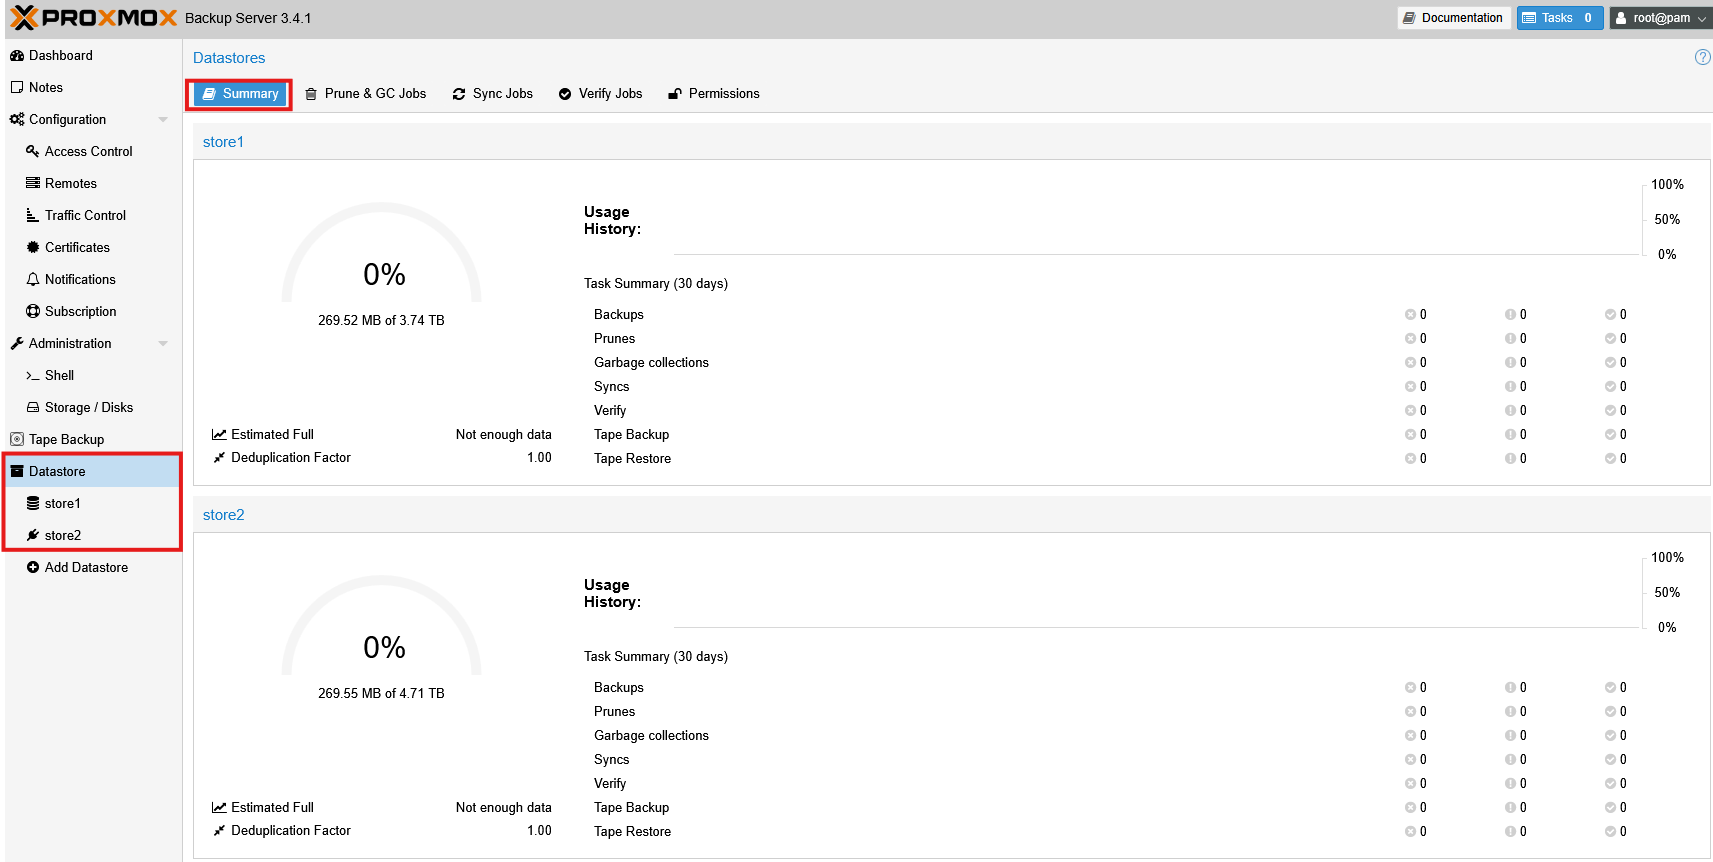
You will notice that the removable datastore has a "plug" icon next to it. This indicates that the datastore is removable and can be disconnected from the server. You can also see the size of the datastore and how much space is used.
Create Namespace (Optional)
Namespaces are used to organize your backups and make it easier to manage them. I find it best to create a namespace for each Proxmox server I plan to backup. I typically only run two, my production server and my bench server (used for creating videos and testing). A namespace is not required, and if none is created the backups will be stored under the root namespace.
Open the Proxmox Backup Server web interface and click on the Datastore tab. Select the datastore you want to create a namespace for (store1) and click on the Add Namespace button under the "Content" section.

I've entered bob-backups as my primary server is named bob. I will also create a namespace for my bench server mario. This will help keep the backups organized and make it easier to manage them. The namespace will be created and you will see it listed under the datastore.

We will configure the namespaces later when we set up the backup jobs. For now, you can leave the namespace as is.
Configure Datastore
After creating the datastore it must be configured. This is where you can set the various policies for your backups.
Pruning policy
The pruning policy determines how long backups are kept before they are deleted. This is important for managing storage space and ensuring that you have enough space for new backups. Select the primary datastore (store1) and click on the Prune & GC Jobs tab.

This will show you the current pruning policy for the datastore, which currently does not exist. Create one by clicking "Add". I prefer to keep the last 7 days of backups and 4 weekly backups and have it scheduled to run daily. There are a few options for running daily, I usually set it to run at 00:00.
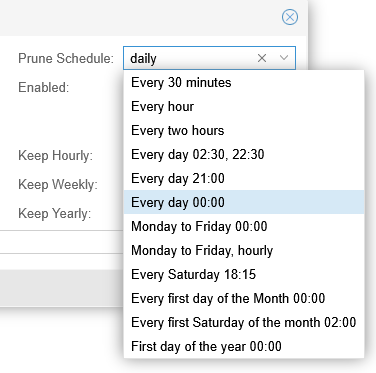
Here is my configuration, click "Add" when you are done (make sure to select the correct namespace if you decided to create one):
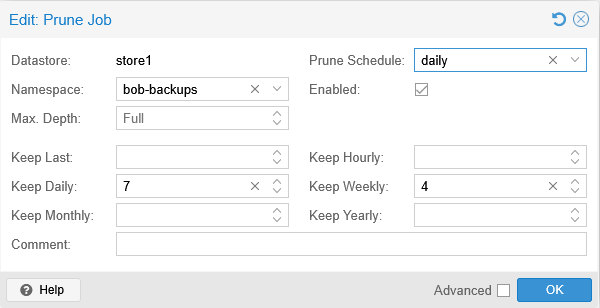
In my case, I have two Proxmox servers (bob and mario) and I want to keep 7 daily backups and 4 weekly backups for each server. I will set the schedule to run every day at 00:00 for bob-backups and 21:00 for mario-backups. This will ensure that I have enough backups to restore from in case of a failure. I will also make sure to select the appropriate namespace for each server. You can also set up the job to run on the root namespace and it will traverse all sub-namespaces if you simply want everything to be backed up at the same time (this is the same for Verify Jobs as well). Here is my completed configuration:

Garbage Collection
Garbage collection is the process of reclaiming space by removing unused data chunks after pruning backups. This is important for maintaining the efficiency and performance of your backup storage.
I will set the garbage collection to run every Sunday at 03:00. Click Edit under Garbage Collect Jobs and either select an option from the dropdown, or enter in a custom schedule. For instance typing in sun 03:00 will set it to run every Sunday at 03:00.

Enable Verification
There are a lot of ways to set up verification. There are configuration options to Skip Verified backups, which will essentially only verify new and stale backups. Backups can be set to go stale after a certain amount of time, which will trigger a reverify. You could get a similar effect by not having backups go stale, and creating a reverification job by unchecking Skip Verified and then running the job monthly.
No matter what way you do it, it is a good idea to ensure that backups are periodically re-verified, as they can become corrupted over time. This is especially important for long-term backups that are stored for extended periods of time.
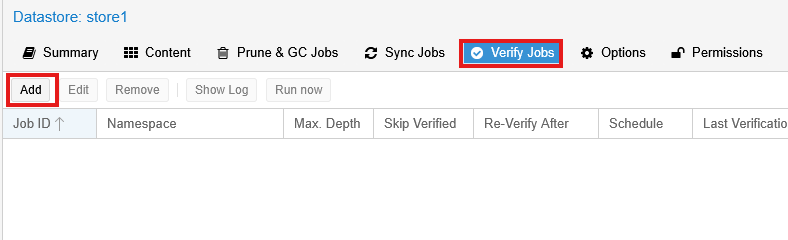
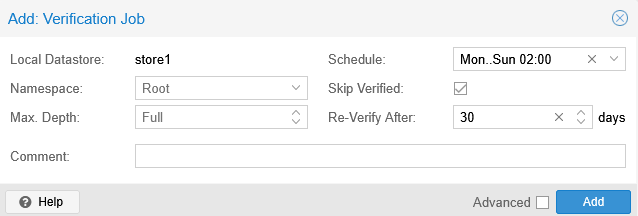
I prefer to run verification of new and stale backups daily, and set backups to go stale after 30 days which will trigger a re-verification. To begin, select the Verify Jobs tab and click on the Add button.
For verify jobs I will use the root namespace which will handle both sub-namespaces. I will set the daily verification job to run at 02:00 (after new backups were created).
Sync Jobs
Sync jobs are used to synchronize backups between different datastores. This is important for ensuring that you have a copy of your backups in case the primary datastore fails. I will set up a sync job to synchronize the backups from the primary datastore (store1) to the secondary datastore (store2) every day at 05:00.
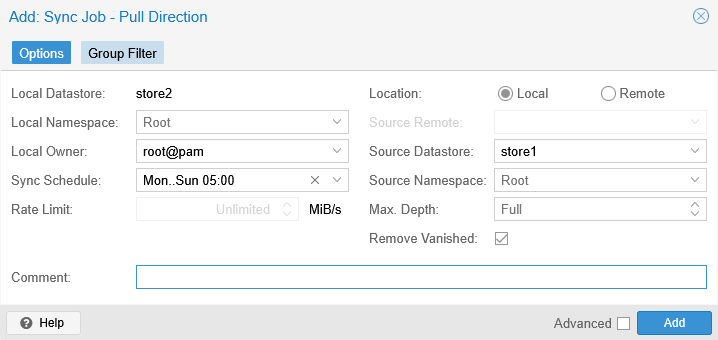
I like to use a "Pull" sync job which is set up under the store2 datastore. This will pull the backups from the primary datastore (store1) to the secondary datastore (store2). You can also set up a "Push" sync job which will push the backups from the primary datastore to the secondary datastore.
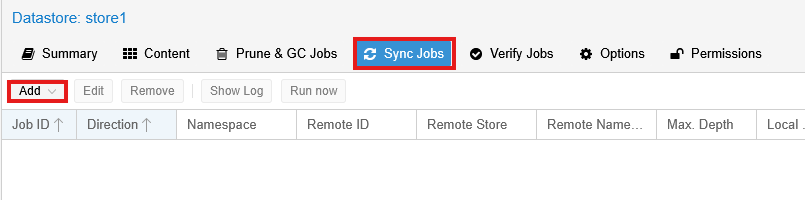
To create a sync job, select the appropriate datastore depending on whether you want to pull or push, then select the Sync Jobs tab and click on the Add button.
In my case, I am using a removable USB drive for my secondary datastore, so I will select Local for the location. If you were to use a network share or another server, you would select Remote and enter the appropriate information. To set it to run everyday at 05:00, enter Mon..Sun 05:00 in the schedule field. This will run the sync job every day at 05:00. I will also be setting this at the root namespace so that it will sync all backups from the sub-namespaces.
Access Control
Restricting access to your datastore is key for security. Create a dedicated backup user and grant them appropriate permissions (e.g., DatastoreAdmin for full control or Datastore.Backup for just backup operations).
Create User
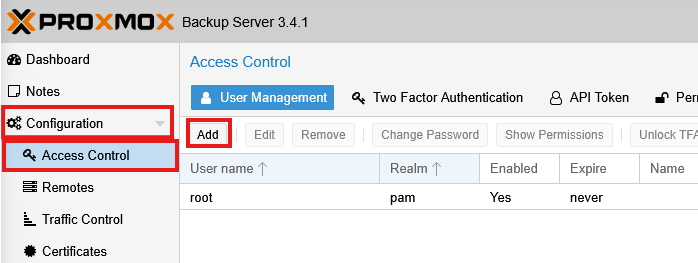
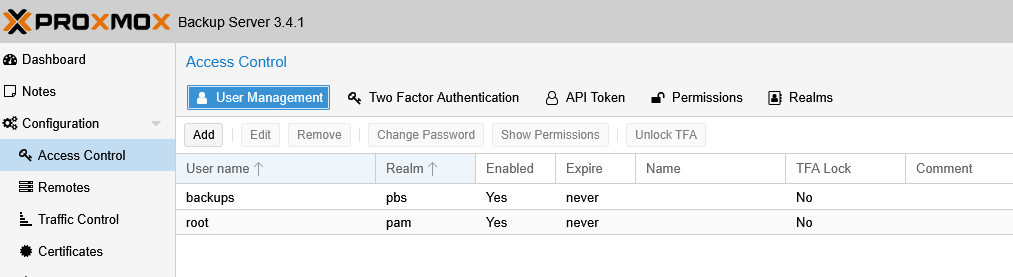
Under Configuration select Access Control and then click Add to add a new user.
Username: backups (or whatever you want to name it)
Realm: Leave default
Password: Enter a strong password
Enabled: Check this box
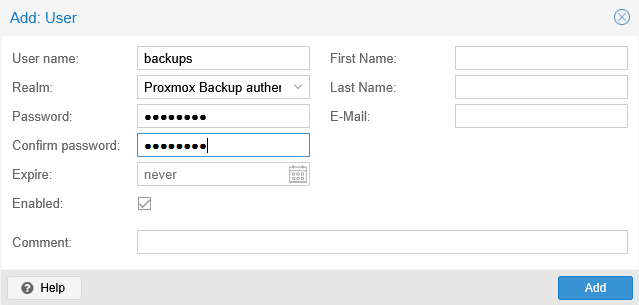
Then click Add to create the user.
Grant Permissions
Now that the user has been created, you need to grant them permissions to access the datastore. This is done on the Permissions tab. Once selected, click on the Add button, then select User Permission to add a new permission.
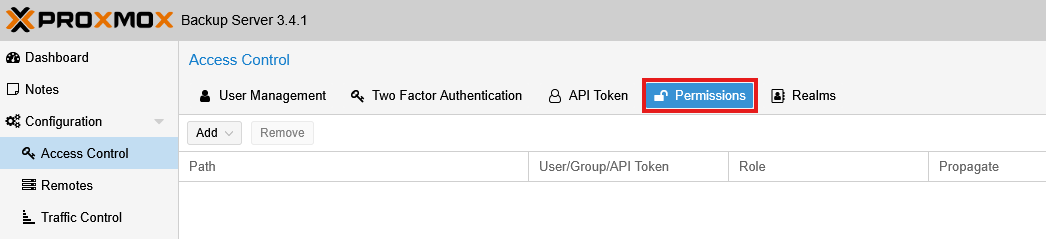
For the Path enter /datastore/store1 (or whatever your datastore is named). For the Role select DatastoreBackup to grant the user permission to back up the datastore. If you want to grant full access to the datastore, select DatastoreAdmin instead.

This user will be used to connect the Proxmox Backup Server to your Proxmox Virtual Environment (PVE) server. Make sure to note the username and password, as you will need them in the next step.
Connect PVE to PBS
Preparing
Now that the datastore on the PBS is set up, you can connect it to your Proxmox Virtual Environment (PVE) server. This will allow you to back up your VMs and containers to the PBS. In order to connect your PBS to your PVE, you will need the the fingerprint and IP of the PBS server. This is used to verify the identity of the server and ensure that you are connecting to the correct server. You can get the fingerprint by selecting the Dashboard tab and then clicking Show Fingerprint.
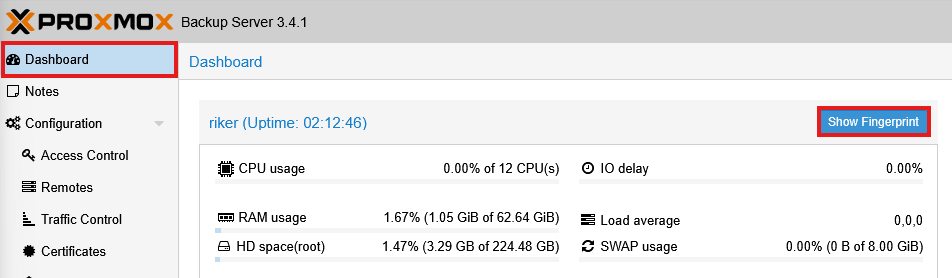
Alternately, you can select the Datastore from the side menu, then under the Summary tab click Show Connection Information. From here you only really need the IP and Fingerprint.
Leave the fingerprint up as you will need it later.
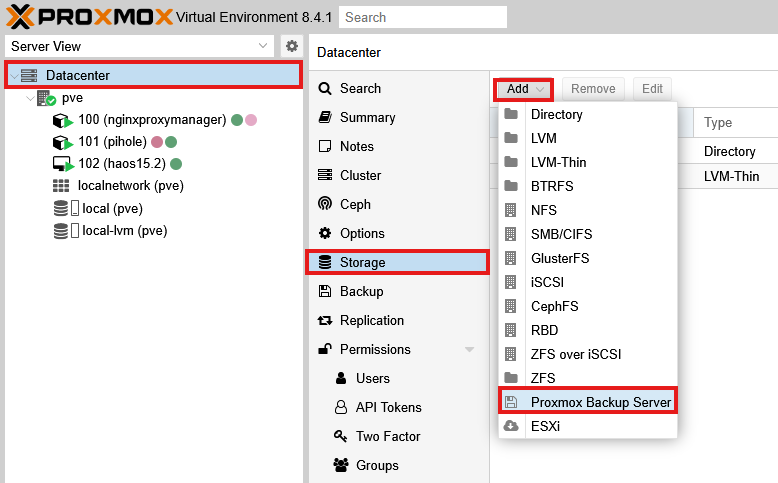
Add PBS to PVE
Now move to your PVE web interface and select Datacenter then Storage. Before we can start backing up to the PBS, we need to add it as a storage location. Click on the Add button and select Proxmox Backup Server from the dropdown menu.
There are quite a few fields here, but it is fairly straightforward. Here is a breakdown of the fields:
- ID: This is the name of the backup server. I usually name it
pbs-backupsor something similar. - Server: This is the IP address or hostname of your Proxmox Backup Server. This is the address you will use to connect to the server.
- Username: The username for the user created in the previous step (backups@pbs). This user will be used to authenticate with the Proxmox Backup Server.
- Password: The password for the user you created in the previous step.
- Datastore: The name of the datastore on your Proxmox Backup Server (store1). This is where your backups will be stored.
- Namespace (optional): This is used to organize your backups and make it easier to manage them. If you do not want to use a namespace, you can omit this if unneeded. For me it was
bob-backupsfor my primary server andmario-backupsfor my bench server. If you do not want to use a namespace, you can leave this field blank. - Fingerprint: This is the fingerprint of your Proxmox Backup Server. You can get this from the
Dashboardtab on the Proxmox Backup Server web interface. This is used to verify the identity of the server and ensure that you are connecting to the correct server.
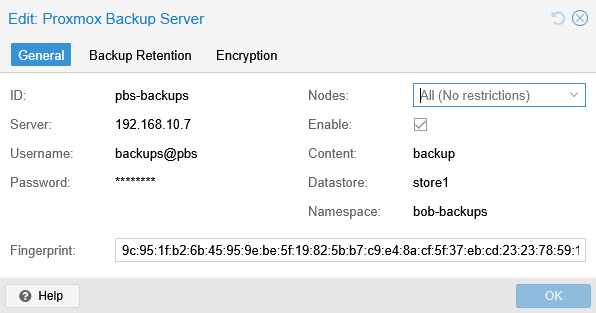
(the above image is after I had already added it which is why it says "Edit: Proxomx Backup Server".)
Since we configured our backup retention policy on the PBS server, you do not need to configure anything under the Backup Retention tab. You can leave Encryption as well unless you want to encrypt your backups. This is a good idea for security, but it will add some overhead to the backup process. If you do not want to encrypt your backups, you can leave this option unchecked.
Click Add to add the Proxmox Backup Server to your Proxmox Virtual Environment. It will authenticate and add your PBS as a new storage location for your backups.
Create Backup Job
Now that the Proxmox Backup Server is connected to your Proxmox Virtual Environment, you can create a backup job. This job will specify which VMs and containers you want to back up, as well as the schedule for the backups. Ensure Datacenter is selected, then select Backup and then Add to create a new backup job.
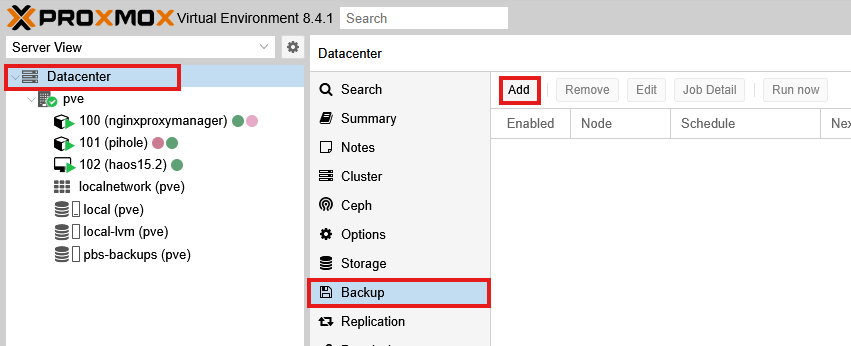
Then configure the backup job.
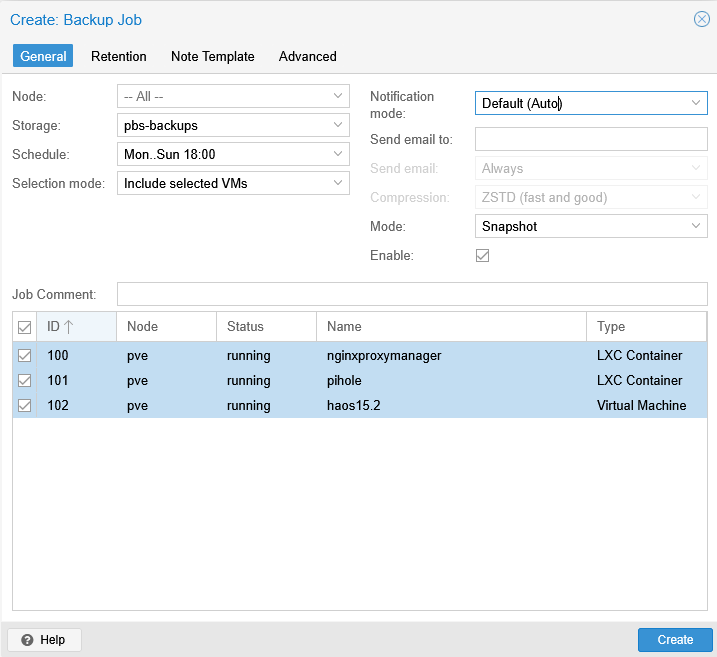
- Node: Select the node you want to back up. This is usually the node where your VMs and containers are located. (I only have
pveso I left it asall) - Storage: Select the Proxmox Backup Server you just added (pbs-backups).
- Schedule: Select the schedule for the backup job. I usually set this to run every day at 18:00
- Notification mode: I leave this as the default (Auto)
- Mode: I usually set this to
Snapshotas it is the most efficient way to back up VMs and containers without downtime.
Ensure it is Enabled and then select the VMs and containers you want to back up. You can select multiple VMs and containers if needed. Click Create to create the backup job.
Testing
Backup Job
To test the job you can click the Run now button.

This will run the backup job immediately and you can check the status of the job in the Tasks tab.

When complete, the backup should be visible in the pbs-backups storage on the PVE server

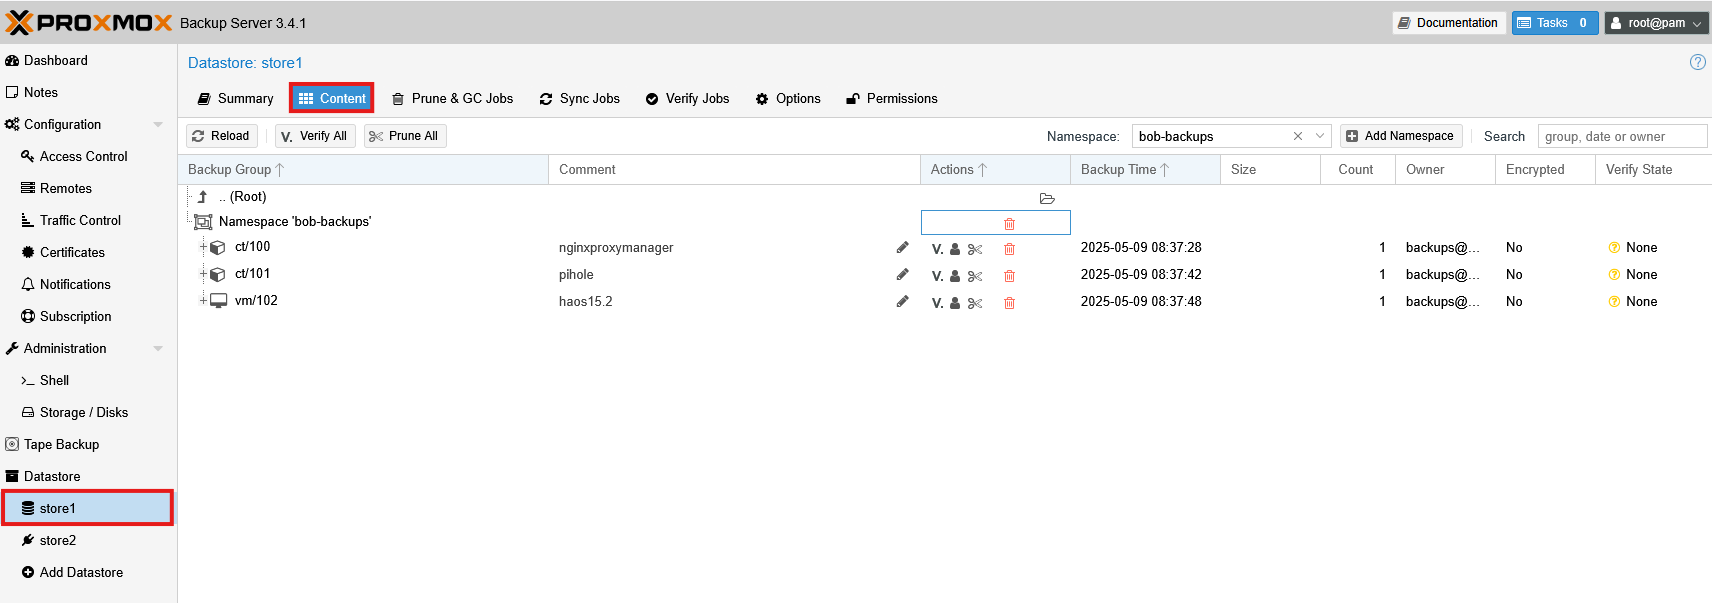
It can also be viewed in the Proxmox Backup Server web interface under the Datastore tab. Select the datastore you want to view and click the Content tab. If you have a namespace, select the namespace you want to view. You should see the backups listed here.
PBS Testing
You can also test the Prune, GC, Sync, and Verify jobs by clicking the Run now button on the respective tabs. This will run the jobs immediately. They should complete with a "TASK OK" message.
Conclusion
Congratulations! You have successfully set up Proxmox Backup Server and connected it to your Proxmox Virtual Environment. You can now back up your VMs and containers to the Proxmox Backup Server and restore them when needed. It's a good idea to monitor the backup jobs and verify that they are running successfully. You can do this by checking the backups in both the PVE server and PBS.